Project Management System
DEMO »
 App for Windows
 App for Linux
 Installation Guide
App for Windows
App for Linux
Installation Guide
Community - these are users and their groups that are available for involvement as Performers and Team members in projects. The user's community is formed as a list of other users of the Program who have responded to the corresponding invitation. Thus, you can only attract a user who is present in the community to your project.
Viewing and editing the community, including sending invitations to join the community to other users, is carried out in the "Community" dialog box available from the list of the "System" submenu of the Main menu (Figure 7.1.A).
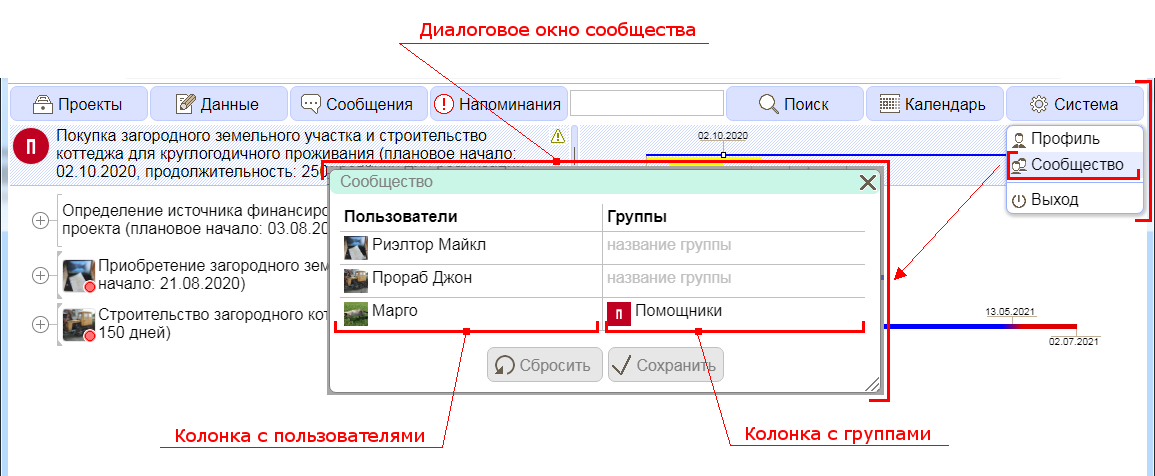
Figure 7.1.A. Community Dialog
The Community dialog box contains a table of users and their groups, as well as Reset and Confirm buttons. The table consists of the following sections:
The "Users" column contains a list of names and images of invited and accepted users (see Chapter 8 for user names and images).
Column "Groups" contains a list of names of user groups with their images. The group image is generated automatically by the Program.
Column positions are not fixed. The left column is unifying in relation to the right. That is, if the left column is "User", then in the right column opposite each user, all groups to which this user belongs will be indicated in the form of nested lines, and vice versa. Switching the positions of the columns is done by clicking on the pop-up buttons of the header cells of the table.
Setting up a community involves adding users to potential Performers or Team members, or removing users, as well as grouping users into groups or excluding users from groups. Before a user is added to the community, he must send an appropriate invitation, and he must accept this invitation. Adding and deleting users is carried out in a mode in which the first column of the table is the "Users" column.
To invite a user, you need to select the “Add” option from the drop-down list by clicking on the pop-up button of any cell with user data and in the added cell enter the user ID in the Program (for user IDs, see Chapter 7) or the user’s email address and confirm your entry. The Program will send a message to the added user with an invitation to participate in the community. Information about sending an invitation until the user accepts the invitation will be displayed in the corresponding cell of the "Users" column (Figure 7.2.A).
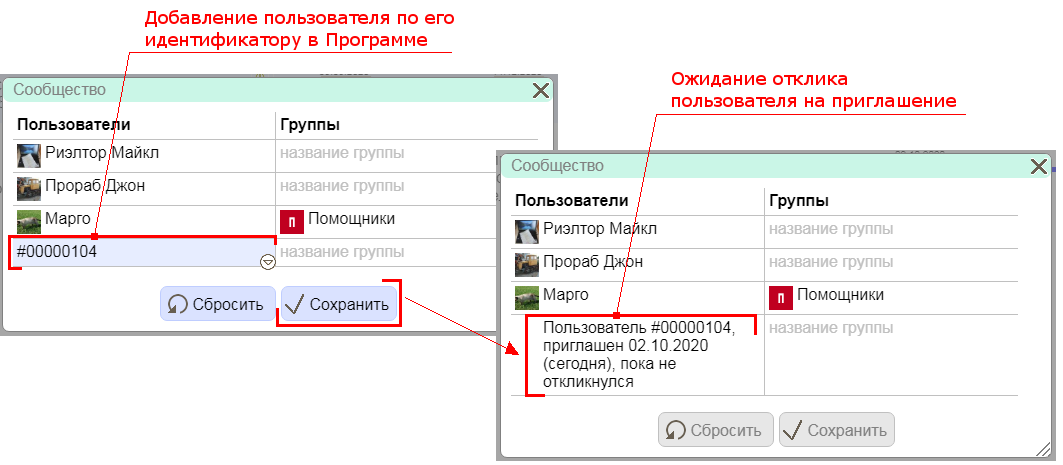
Figure 7.2.A. Invite and wait for user response
After the invited user confirms their willingness to participate in the community, the Program will send an appropriate informational message to the user who invited them (see Chapter 5 for messages).
Removing a user from the community is carried out by selecting the "Delete" option from the drop-down list by clicking on the pop-up button in the field of the corresponding user. You can delete only the user who is not currently bound by an agreement to execute any project. In order to include a user in a group or remove from it, in the second column "Groups" opposite the desired user, select the appropriate option from the drop-down list by clicking on the pop-up button.
Creating and deleting groups, as well as associating users with them, is carried out in the community table display mode, in which the first column is the "Groups" column.